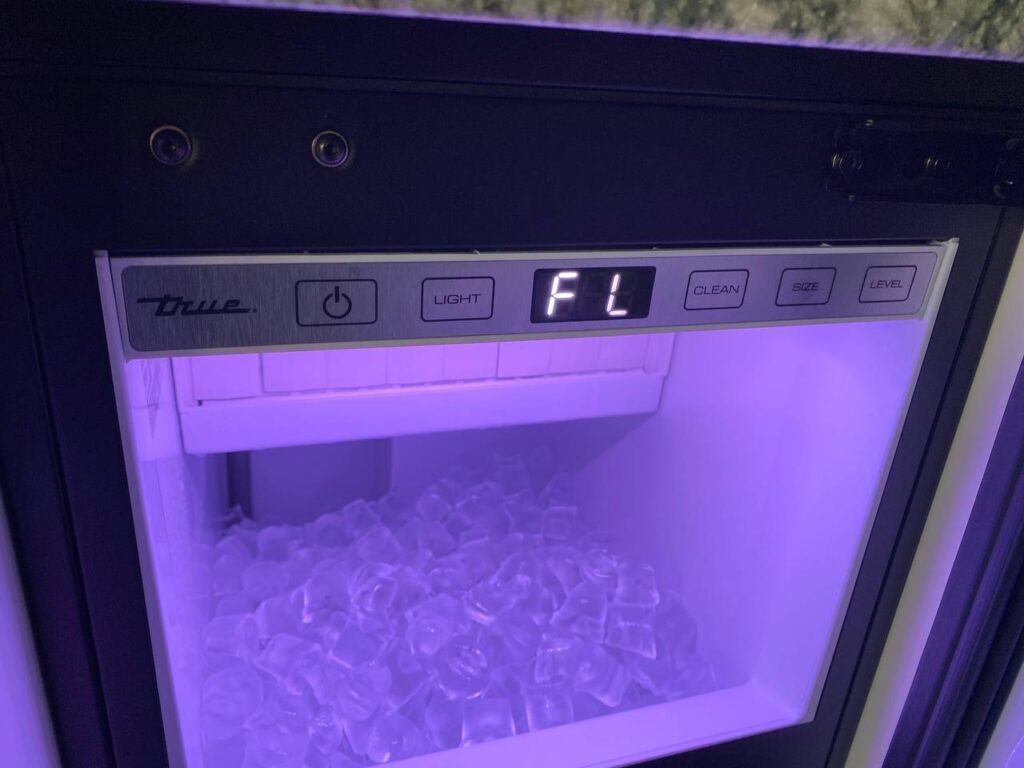
Why is My Commercial Ice Machine Not Making Ice?

Ice inside a True ice machine


Your commercial I c e machine can be used for producing ice in a restaurant or other businesses .Most people say ice is ice but your ice machine should be producing cubed Ice or crushed Ice or nugget Ice or flaked Ice according to the make of the ice machine ,If your commercial ice machine is not producing the desired ice, below is a guide on how to overcome the common commercial ice machine problems like ;

  • Commercial ice machine not making ice
  • Commercial ice machine keeps freezing up
  • Commercial ice machine Is Too Warm
  • Commercial ice machine water flow issues
  • Commercial ice machine Leaks Water

Commercial Ice Machine Troubleshooting Steps

Ice is made either by batch process: In batch ice machines, water is poured into individual molds, frozen until solid, and then released into a storage bin. This method is common in smaller, household ice makers, offering convenience and ease of use, or by;

Continuous Process: On the other hand, continuous ice machines constantly produce ice by circulating water over a cooled surface, forming a layer of ice that is then harvested and broken into desired shapes. This method is prevalent in commercial settings due to its efficiency and high output capacity.

To overcome challenges encountered whilst using your Commercial ice machine ,The guide below should come in handy;

  1. No Ice Production:
    Check water supply: Ensure the water line is connected and open.
  2. Ice Quality Issues:
  3. Machine Overheating:
  4. Electrical Problems:
  5. Unusual Noises:

Contact a certified technician for further assistance if any of the above problems persist.

Some ice machine brands whose repair we handle : Hoshizaki ice machines, Scotsman ice machines, Koolaire ice machines, True ice machines, Manitowoc ice makers, Ice-o-Matic ice machines, etc.

Common Ice Machine Problems

When your commercial ice machine starts displaying the following problems; You might want to call a Commercial ice machine repair service near me.

  1. Lack of Power
    The first thing to check when your ice machine is not working is the power source. Ensure that the machine is properly plugged in and that the power outlet is functioning especially in instances of ice machine under the counter, check for any tripped circuit breakers or blown fuses that may be affecting the power supply to the ice machine.
  2. Water Supply Issues
    Ice machines require a consistent supply of water to produce ice. If your ice machine is not working, check the water supply to ensure that it is connected and turned on. Inspect the water inlet valve for any clogs or blockages that may be preventing water from flowing into the machine.
  3. Dirty Condenser Coils
    Over time, dust, dirt, and debris can accumulate on the condenser coils of your ice machine, leading to reduced efficiency and poor performance. Inspect the condenser coils and clean them using a soft brush or vacuum to remove any buildup that may be hindering the cooling process.
  4. Malfunctioning Thermostat
    A faulty thermostat can cause your ice machine to malfunction or produce ice inconsistently. Test the thermostat of your ice machine using a multimeter to determine if it is functioning correctly. If the thermostat is defective, consider replacing it to restore proper functionality to your ice machine.
  5. Ice Maker Components
    Inspect the various components of your ice machine, including the ice maker assembly, water pump, and evaporator plate, for any signs of damage or wear. Replace any worn-out or broken parts to ensure that your ice machine operates smoothly and efficiently.
  6. Improper Installation
    If your ice machine is a new installation or has recently been moved, ensure that it is properly leveled and aligned. Improper installation can cause issues with the ice production process and lead to malfunctions. Refer to the manufacturer’s instructions for guidelines on the correct installation of your ice machine.

At their core, ice machines operate on a relatively simple principle: they freeze water and then dispense it in various forms. However, within this simplicity lies a world of innovation and engineering. You can reach out to a local ice machine repair to properly diagnose it if facing any Commercial ice machine problems.

Tips to Maintain Your Commercial Ice Maker

Maintaining a commercial ice maker is essential for ensuring its longevity and efficiency. Here are some tips to help you keep your commercial ice maker in top condition:

  • Tip 1: Regular Cleaning:
    • Clean your ice maker regularly according to the manufacturer’s guidelines. This typically involves removing and sanitizing removable parts like the ice bin, ice scoops, and water distribution system. Use a mixture of warm water and mild detergent or a specialized ice machine cleaner.
  • Tip 2: Sanitization:
    • Regularly sanitize the ice maker to prevent the growth of bacteria and mold. Use a food-grade sanitizer approved for use in ice machines. Follow the instructions carefully to ensure proper sanitation.
  • Tip 3: Filter Replacement:
    • Replace the water filter according to the manufacturer’s recommendations. A clean filter helps maintain water quality and prevents mineral buildup in the ice maker, which can affect ice quality and machine performance.
  • Tip 4: Inspect for Leaks:
    • Check for any leaks in the water supply line, fittings, and connections. Even small leaks can lead to water damage and affect the performance of the ice maker.
  • Tip 5: Monitor Ice Quality:
    • Keep an eye on the quality of the ice produced by the machine. If you notice any unusual taste, odor, or discoloration in the ice, it could indicate a problem with the machine or water supply. Investigate and address the issue promptly.
  • Tip 6: Ventilation:
    • Ensure proper ventilation around the ice maker to prevent overheating. Clear any obstructions around the machine’s vents and allow for adequate airflow.

By following these tips, you can prolong the life of your commercial ice maker and ensure that it continues to produce high-quality ice for your business needs.


The Ultimate Guide to Cleaning Refrigerator Condenser Coils for Optimal Performance

Your refrigerator is an essential appliance that keeps your food fresh and your beverages chilled. However, over time, the condenser coils located at the back or bottom of your refrigerator can become coated with dust, debris, and pet hair, hindering its efficiency and causing it to work harder. Cleaning your refrigerator condenser coils regularly is a simple maintenance task that can greatly improve its performance and extend its lifespan. In this comprehensive guide, we will walk you through the step-by-step process of cleaning refrigerator condenser coils effectively.

Why Clean Refrigerator Condenser Coils?

The condenser coils in your refrigerator play a crucial role in the cooling process. When these coils are covered in dirt and debris, they cannot release heat properly, leading to decreased cooling efficiency and increased energy consumption. By cleaning the condenser coils, you can:


    1. Enhance Cooling Efficiency: Clean coils facilitate the dissipation of heat, allowing your refrigerator to cool more effectively and maintain consistent temperatures.

    1. Reduce Energy Consumption: When your refrigerator’s condenser coils are clean, the compressor doesn’t have to work as hard to cool the unit, resulting in lower energy consumption and reduced utility bills.

    1. Prolong Appliance Lifespan: Regular maintenance, including cleaning the condenser coils, helps prevent unnecessary strain on the compressor, leading to a longer lifespan for your refrigerator.

Step-by-Step Guide to Cleaning Refrigerator Condenser Coils:


    1. Preparation:

a. Safety First: Unplug your refrigerator from the power source to avoid any electrical accidents during the cleaning process.

b. Locate the Coils: Depending on your refrigerator model, the condenser coils can be found either at the back of the unit or beneath it. Refer to your refrigerator’s user manual for specific instructions.


    1. Accessing the Coils:

a. Back-Coil Refrigerators: Pull the refrigerator away from the wall to access the coils located at the back. If necessary, remove the rear access panel using a screwdriver.

b. Bottom-Coil Refrigerators: If the coils are located at the bottom, remove the grill or kickplate at the front of the refrigerator using a screwdriver or by releasing the clips.


    1. Cleaning the Coils:

a. Vacuuming: Use a soft brush attachment or a handheld vacuum cleaner to remove loose dirt and debris from the coils. Gently run the brush or vacuum along the coils, paying attention to the areas with the most buildup.

b. Brushing: For stubborn dirt or pet hair, use a coil cleaning brush or a long, soft-bristled brush to dislodge the debris. Be careful not to bend or damage the delicate coils.

c. Compressed Air: If available, you can use compressed air to blow away dust and debris from the coils. Ensure you hold the canister upright and maintain a safe distance to prevent damage to the coils.

d. Repeat if Necessary: If the coils are heavily soiled, repeat the cleaning process until they are visibly clean and free of debris.


    1. Reassembling and Finishing:

a. Back-Coil Refrigerators: Replace the rear access panel securely and push the refrigerator back into its original position.

b. Bottom-Coil Refrigerators: Reattach the grill or kickplate, ensuring it is securely in place.

c. Plug in the Refrigerator: Once you’ve reassembled everything, plug the refrigerator back into the power source.


    1. Regular Maintenance:

a. Frequency: It is recommended to clean your refrigerator condenser coils at least once every six months. However, households with pets or excessive dust may require more frequent cleaning.

b. Surrounding Area: To prevent rapid reaccumulation of dust, keep the area around your refrigerator clean and free from excessive dirt and debris.

Regularly cleaning your refrigerator condenser coils is a simple yet crucial maintenance task that can significantly enhance its performance and extend its lifespan. By following the step-by-step guide outlined above, you can effectively remove dirt, debris, and pet hair from the coils, ensuring optimal cooling efficiency and reducing energy consumption. Make it a habit to include condenser coil cleaning in your regular maintenance routine, and your refrigerator will thank you with improved performance and lower energy bills.

Microwave Not Heating Food but Still Runs? Here’s How to Fix It!

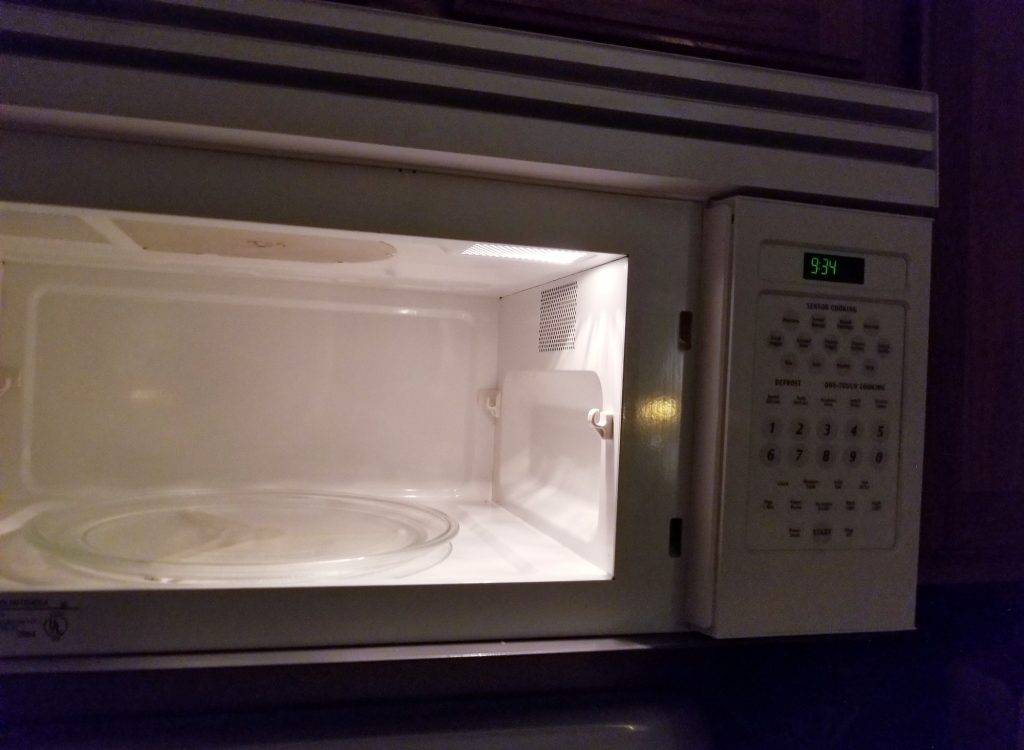
A microwave is a convenient appliance that allows for quick and efficient heating of food. However, encountering a situation where your microwave runs but fails to heat your food can be frustrating. Don’t worry, though—this issue is often fixable without the need for costly repairs or replacements. In this comprehensive guide, we will walk you through a step-by-step troubleshooting process to identify and resolve the problem, so you can enjoy perfectly heated meals once again.

  1. Check the Power Source and Settings:

Start with the basics to rule out any minor issues:

   a. Power Source: Ensure that the microwave is properly plugged into a functioning power outlet. Check the circuit breaker or fuse box to ensure that power is reaching the microwave.

   b. Settings: Verify that the microwave is set to the desired power level and cooking time. Incorrect settings may prevent the microwave from heating food properly.

2. Examine the Door and Door Switches:

A faulty door or malfunctioning door switches can disrupt the microwave’s heating functionality. Follow these steps:

   a. Door Alignment: Check if the microwave door is closing properly and aligning correctly. Any gaps or misalignment can prevent the microwave from heating.

   b. Door Switches: The door switches, located inside the microwave’s door latch mechanism, ensure that the microwave stops heating when the door is opened. Inspect the switches for any signs of damage or misalignment. If found faulty, they may need to be replaced.

3. Inspect the High Voltage Diode, Capacitor, and Magnetron:

These components are crucial for generating and delivering microwave heat. Follow these safety precautions before proceeding:

   a. Unplug the Microwave: Ensure the microwave is disconnected from the power source before handling any internal components.

   b. Access the Components: Consult the microwave’s user manual or online resources to locate the high voltage diode, capacitor, and magnetron. They are typically found behind the control panel.

   c. Visual Inspection: Carefully inspect these components for any visible signs of damage, such as burnt marks or swelling. If any issues are detected, consider replacing the faulty component(s).

4. Reset the Thermal Fuse:

The thermal fuse is a safety feature that protects the microwave from overheating. If it is tripped, the microwave will not heat. Here’s how to reset it:

   a. Locate the Fuse: Consult the user manual or online resources to find the location of the thermal fuse. It is typically located behind the control panel or on the top or side of the microwave’s cavity.

   b. Reset the Fuse: Follow the manufacturer’s instructions to reset the thermal fuse. This usually involves removing and reinserting the fuse or pressing a reset button.

5. Seek Professional Assistance:

If none of the above steps resolve the issue or if you’re uncomfortable handling internal components, it’s advisable to contact a professional technician or the microwave’s manufacturer for further assistance. They have the expertise and specialized tools to diagnose and repair complex microwave problems.

Conclusion:

Dealing with a microwave that runs but doesn’t heat food can be frustrating, but don’t let it dampen your culinary experience. By following the step-by-step troubleshooting process outlined above, including checking the power source and settings, examining the door and door switches, inspecting the high voltage diode, capacitor, and magnetron, and resetting the thermal fuse, you can often resolve the issue and restore your microwave’s heating functionality. Remember to prioritize safety, and if you encounter any challenges or concerns during the troubleshooting process, it’s best to seek professional assistance. With a little troubleshooting and possibly minor repairs, you’ll soon be back to enjoying perfectly heated meals from your microwave.

How to Improve the Taste of Ice from Your Ice Maker

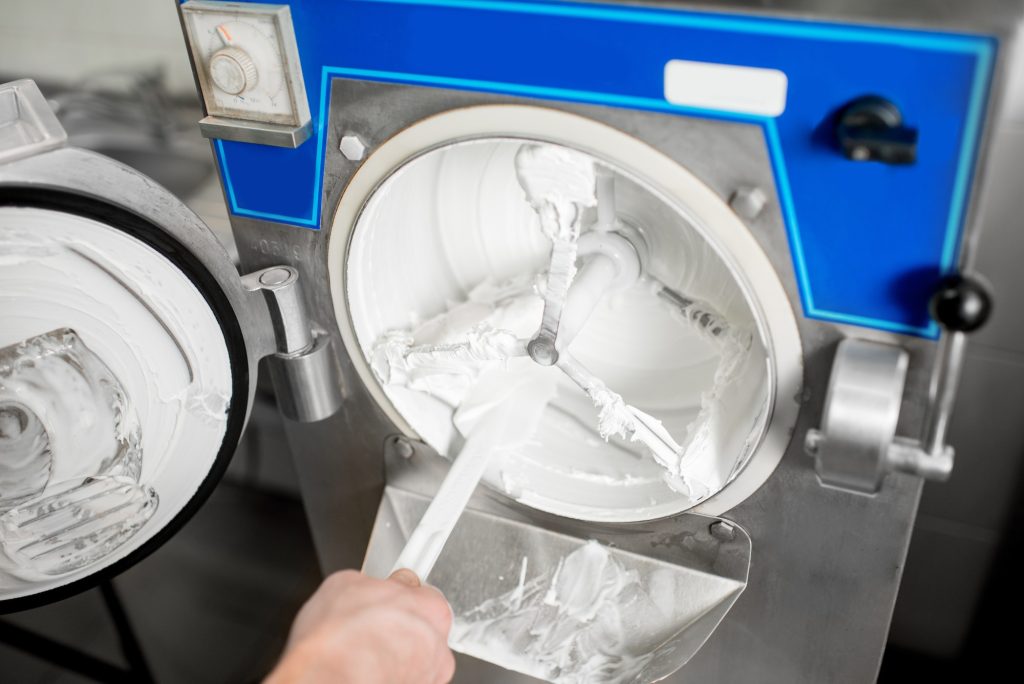
There’s nothing quite as refreshing as a cold drink with ice cubes, but what happens when the ice from your ice maker tastes unpleasant or even funky? Don’t worry; you don’t have to settle for subpar ice. In this comprehensive guide, we will explore the common causes of bad-tasting ice from your ice maker and provide you with effective solutions to improve its taste, ensuring you can enjoy clean and refreshing ice cubes every time.

1. Identifying the Problem:

Before taking action, it’s important to determine the specific issue causing the bad taste in your ice. Here are some common causes:

   a. Contaminated Water: If your ice cubes taste off or have a strange odor, the water supply to your ice maker may be contaminated.

   b. Dirty Ice Maker: A buildup of mold, mildew, or food particles in your ice maker can transfer unpleasant flavors to the ice cubes.

   c. Old or Stale Filters: Over time, the water filter in your ice maker can become less effective at removing impurities, leading to compromised ice quality.

2. Solutions to Improve Ice Taste:

   a. Clean the Ice Maker: Regularly cleaning your ice maker is crucial for maintaining its performance and the quality of the ice it produces. Follow the manufacturer’s instructions to clean the ice maker thoroughly, ensuring all visible debris and residues are removed.

   b. Change the Water Filter: If your ice maker has a water filtration system, replace the filter according to the manufacturer’s recommendations or at least every six months. A fresh filter will help eliminate impurities and improve the taste of the ice.

   c. Flush the Water Line: To remove any lingering contaminants in the water supply line, consider flushing it. Turn off the ice maker, disconnect the water line, and run water through it for a few minutes to clear any debris or build-up.

   d. Check the Water Supply: If your ice maker is connected to a water supply line, ensure that the water source is clean and free from any unusual taste or odor. If necessary, contact a professional plumber to assess and rectify any issues with the water supply.

   e. Use Ice More Frequently: If the ice maker is not used frequently, ice cubes may develop an unpleasant taste due to prolonged storage. Try using the ice more regularly and replacing it with fresh ice to maintain its quality.

   f. Use Filtered or Bottled Water: If your tap water has an off taste, consider using filtered or bottled water to make ice cubes. This can significantly improve the taste of the ice.

3. Prevention and Maintenance:

   a. Regular Cleaning: Make it a habit to clean your ice maker at least every three to six months to prevent the build-up of mold, bacteria, and other contaminants.

   b. Proper Storage: Store ice cubes in airtight containers or bags to prevent them from absorbing odors or flavors from the freezer.

   c. Regular Filter Replacement: Stay diligent about replacing the water filter in your ice maker as recommended by the manufacturer to ensure clean and great-tasting ice.

   d. Professional Maintenance: If you’ve tried the above solutions and the problem persists, consider contacting a professional appliance technician. They can provide a thorough assessment of your ice maker and address any underlying issues.

Troubleshooting Guide: How to Fix a Dryer That Smells Like Burning

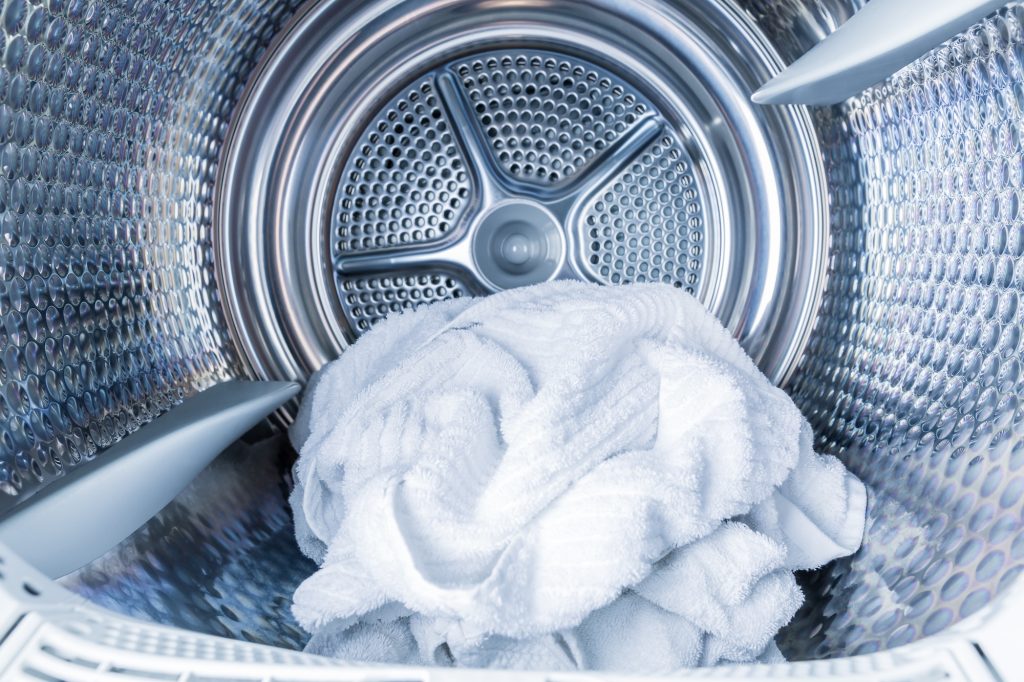
Discovering a burning smell emanating from your dryer can be concerning and disruptive to your laundry routine. Not only is it unpleasant, but it could also be a sign of a potential fire hazard. It’s important to address this issue promptly to ensure the safety of your home and prevent any further damage to your dryer. In this comprehensive guide, we will walk you through the step-by-step process of troubleshooting and fixing a dryer that smells like burning.

1. Clean the Lint Filter and Ventilation System:

A clogged lint filter or ventilation system can restrict the airflow in your dryer, causing it to overheat and emit a burning smell. Follow these steps to clean them:

   a. Lint Filter: Remove the lint filter and clean it thoroughly under running water. Allow it to dry completely before reinserting it into the dryer.

   b. Ventilation System: Disconnect the dryer from the power source and detach the vent hose from the back of the dryer. Clean the vent hose and the vent opening on the exterior of your home using a vacuum cleaner or a vent cleaning brush.

2. Check for Obstructions:

Objects such as loose fabric, small articles of clothing, or even small rodents can find their way into the dryer’s drum or exhaust system, leading to burning smells. Perform the following checks:

   a. Dryer Drum: Inspect the drum and remove any foreign objects. Check the seals and gaskets for any signs of wear or damage.

   b. Exhaust System: Ensure that the exhaust system, including the exhaust hose or duct, is clear of any obstructions. Clear out any lint or debris that may have accumulated.

3. Examine the Heating Element:

A malfunctioning or damaged heating element can cause the dryer to overheat and emit a burning odor. Follow these steps to assess the heating element:

   a. Disconnect the Dryer: Unplug the dryer from the power source.

   b. Locate the Heating Element: Refer to your dryer’s user manual to locate the heating element. It is usually found behind the dryer drum or at the bottom of the appliance.

   c. Inspect for Damage: Visually inspect the heating element for any signs of damage, such as visible burn marks or broken coils. If you notice any issues, it may need to be replaced.

4. Evaluate the Belt and Drum Rollers:

Worn-out drum rollers or a loose or damaged belt can cause friction and generate a burning smell. Check these components as follows:

   a. Belt: Carefully inspect the dryer belt for signs of wear, fraying, or stretching. If the belt appears damaged, it may require replacement.

   b. Drum Rollers: Examine the drum rollers for wear or damage. They should rotate smoothly without any excessive noise or resistance. If they are worn out, consider replacing them.

5. Seek Professional Assistance:

If the burning smell persists or you’re uncomfortable performing any of the above steps, it’s recommended to seek professional assistance. An experienced appliance technician can diagnose the issue accurately and provide the necessary repairs or replacements.

Conclusion:

A dryer that smells like burning is a cause for concern, and addressing the issue promptly is essential for safety and optimal appliance performance. By following the troubleshooting steps outlined above, including cleaning the lint filter and ventilation system, checking for obstructions, examining the heating element, and evaluating the belt and drum rollers, you can identify and resolve common causes of the burning smell. However, if the problem persists or you’re unsure about performing the repairs yourself, it’s best to consult a professional technician to ensure a thorough assessment and proper resolution. Prioritize safety and maintenance to keep your dryer running efficiently and odor-free.

Extending the Lifespan of Your Restaurant Equipment

Commercial Restaurant Equipment Services 

Your commercial kitchen appliances are valuable investments, and proper care can ensure they serve you for years to come. In this blog, we provide essential tips on maintaining and extending the lifespan of your restaurant equipment.

From regular cleaning routines to identifying warning signs, taking proactive steps can prevent costly repairs and replacements. Learn how to keep your commercial oven, commercial dishwasher, ice machine, and other kitchen appliances in optimal condition, guaranteeing their reliability and efficiency throughout their lifetime. Preserve your appliances, save money, and enjoy peace of mind with these expert maintenance tips!

Never compromise when it comes to safeguarding your precious restaurant equipment. At Fix Appliance Services, our commitment lies in ensuring your kitchen operates seamlessly. From basic preventive maintenance to intricate compressor and motor fixes, our comprehensive range of restaurant equipment services are tailored to meet your commercial repair needs. Count on us to streamline the process, swiftly restoring your restaurant or facility to full functionality.

Contact Fix Appliance Services to arrange a maintenance plan.

Energy-Efficient Appliances: Saving the Planet and Your Wallet

Did you know that upgrading to energy-efficient home appliances can have a significant impact on both the environment and your utility bills? In this blog, we explore the benefits of energy-efficient appliances and how they contribute to reducing carbon footprints. From eco-friendly refrigerators to low-consumption washing machines, these appliances not only preserve natural resources but also help you save on energy costs in the long run. Discover how making a simple switch to greener appliances can make a big difference for both your pocket and the planet! @arthur

Top 5 Common Home Appliance Problems and How to Fix Them

Is your home appliance acting up, causing inconvenience to your daily routine? Don’t fret! In this blog, we’ll discuss the top 5 common home appliance problems and offer quick DIY fixes to get them up and running again. From a malfunctioning refrigerator to a noisy dishwasher, we’ve got you covered. Remember to always prioritize safety and, if unsure, consult a professional appliance repair service to avoid further damage. With a little know-how and some simple troubleshooting, you can save time and money by keeping your home appliances in top-notch condition!